1.2. Introduction to QGIS
1.2.1. Installing QGIS
QGIS software is written in the C++ programming language, its development started in early 2002 and the software is constantly updated thought regular releases and bug fixes thanks to the collaborative effort of a large community of developers and users, under the advocacy of the OpenSource Geospatial Foundation (OSGeo) .
QGIS can be downloaded from the official QGIS website after selecting from the available installation packages the one for your operating system. It is always suggested to work with the Long-Term Release (LTR) version of the software which is the current stable and best-maintained release.
1.2.1.1. Download QGIS for Windows
Click on this link to open the official QGIS website. By default the drop down menu Download for Windows will be opened. To start the download click on Looking for the most stable version? Get QGIS 3.34 LTR (1). Follow the installation steps. (Fig. 1.2.1.1)

Fig. 1.2.1.1 – Download QGIS for windows
1.2.1.2. Download QGIS for macOS
Click on this link to open the official QGIS website. Open the drop down menu Download for macOS. Click on: Looking for the most stable version? Get QGIS 3.34 LTR (1) to start the download then follow the installation steps. As stated over the download button (2). (Fig. 1.2.1.2)
Warning
Remember that: “After installing QGIS, the first launch attempt may fail due to security protections. To enable QGIS, control-click on its icon in your Applications folder and select Open in the context menu. A confirmation dialog will display where you need to click the Open button again. This only has to be done once.” .
Hint
macOS High Sierra (10.13) or later versions are required. QGIS is not yet notarized as required by macOS Catalina (10.15) security rules.
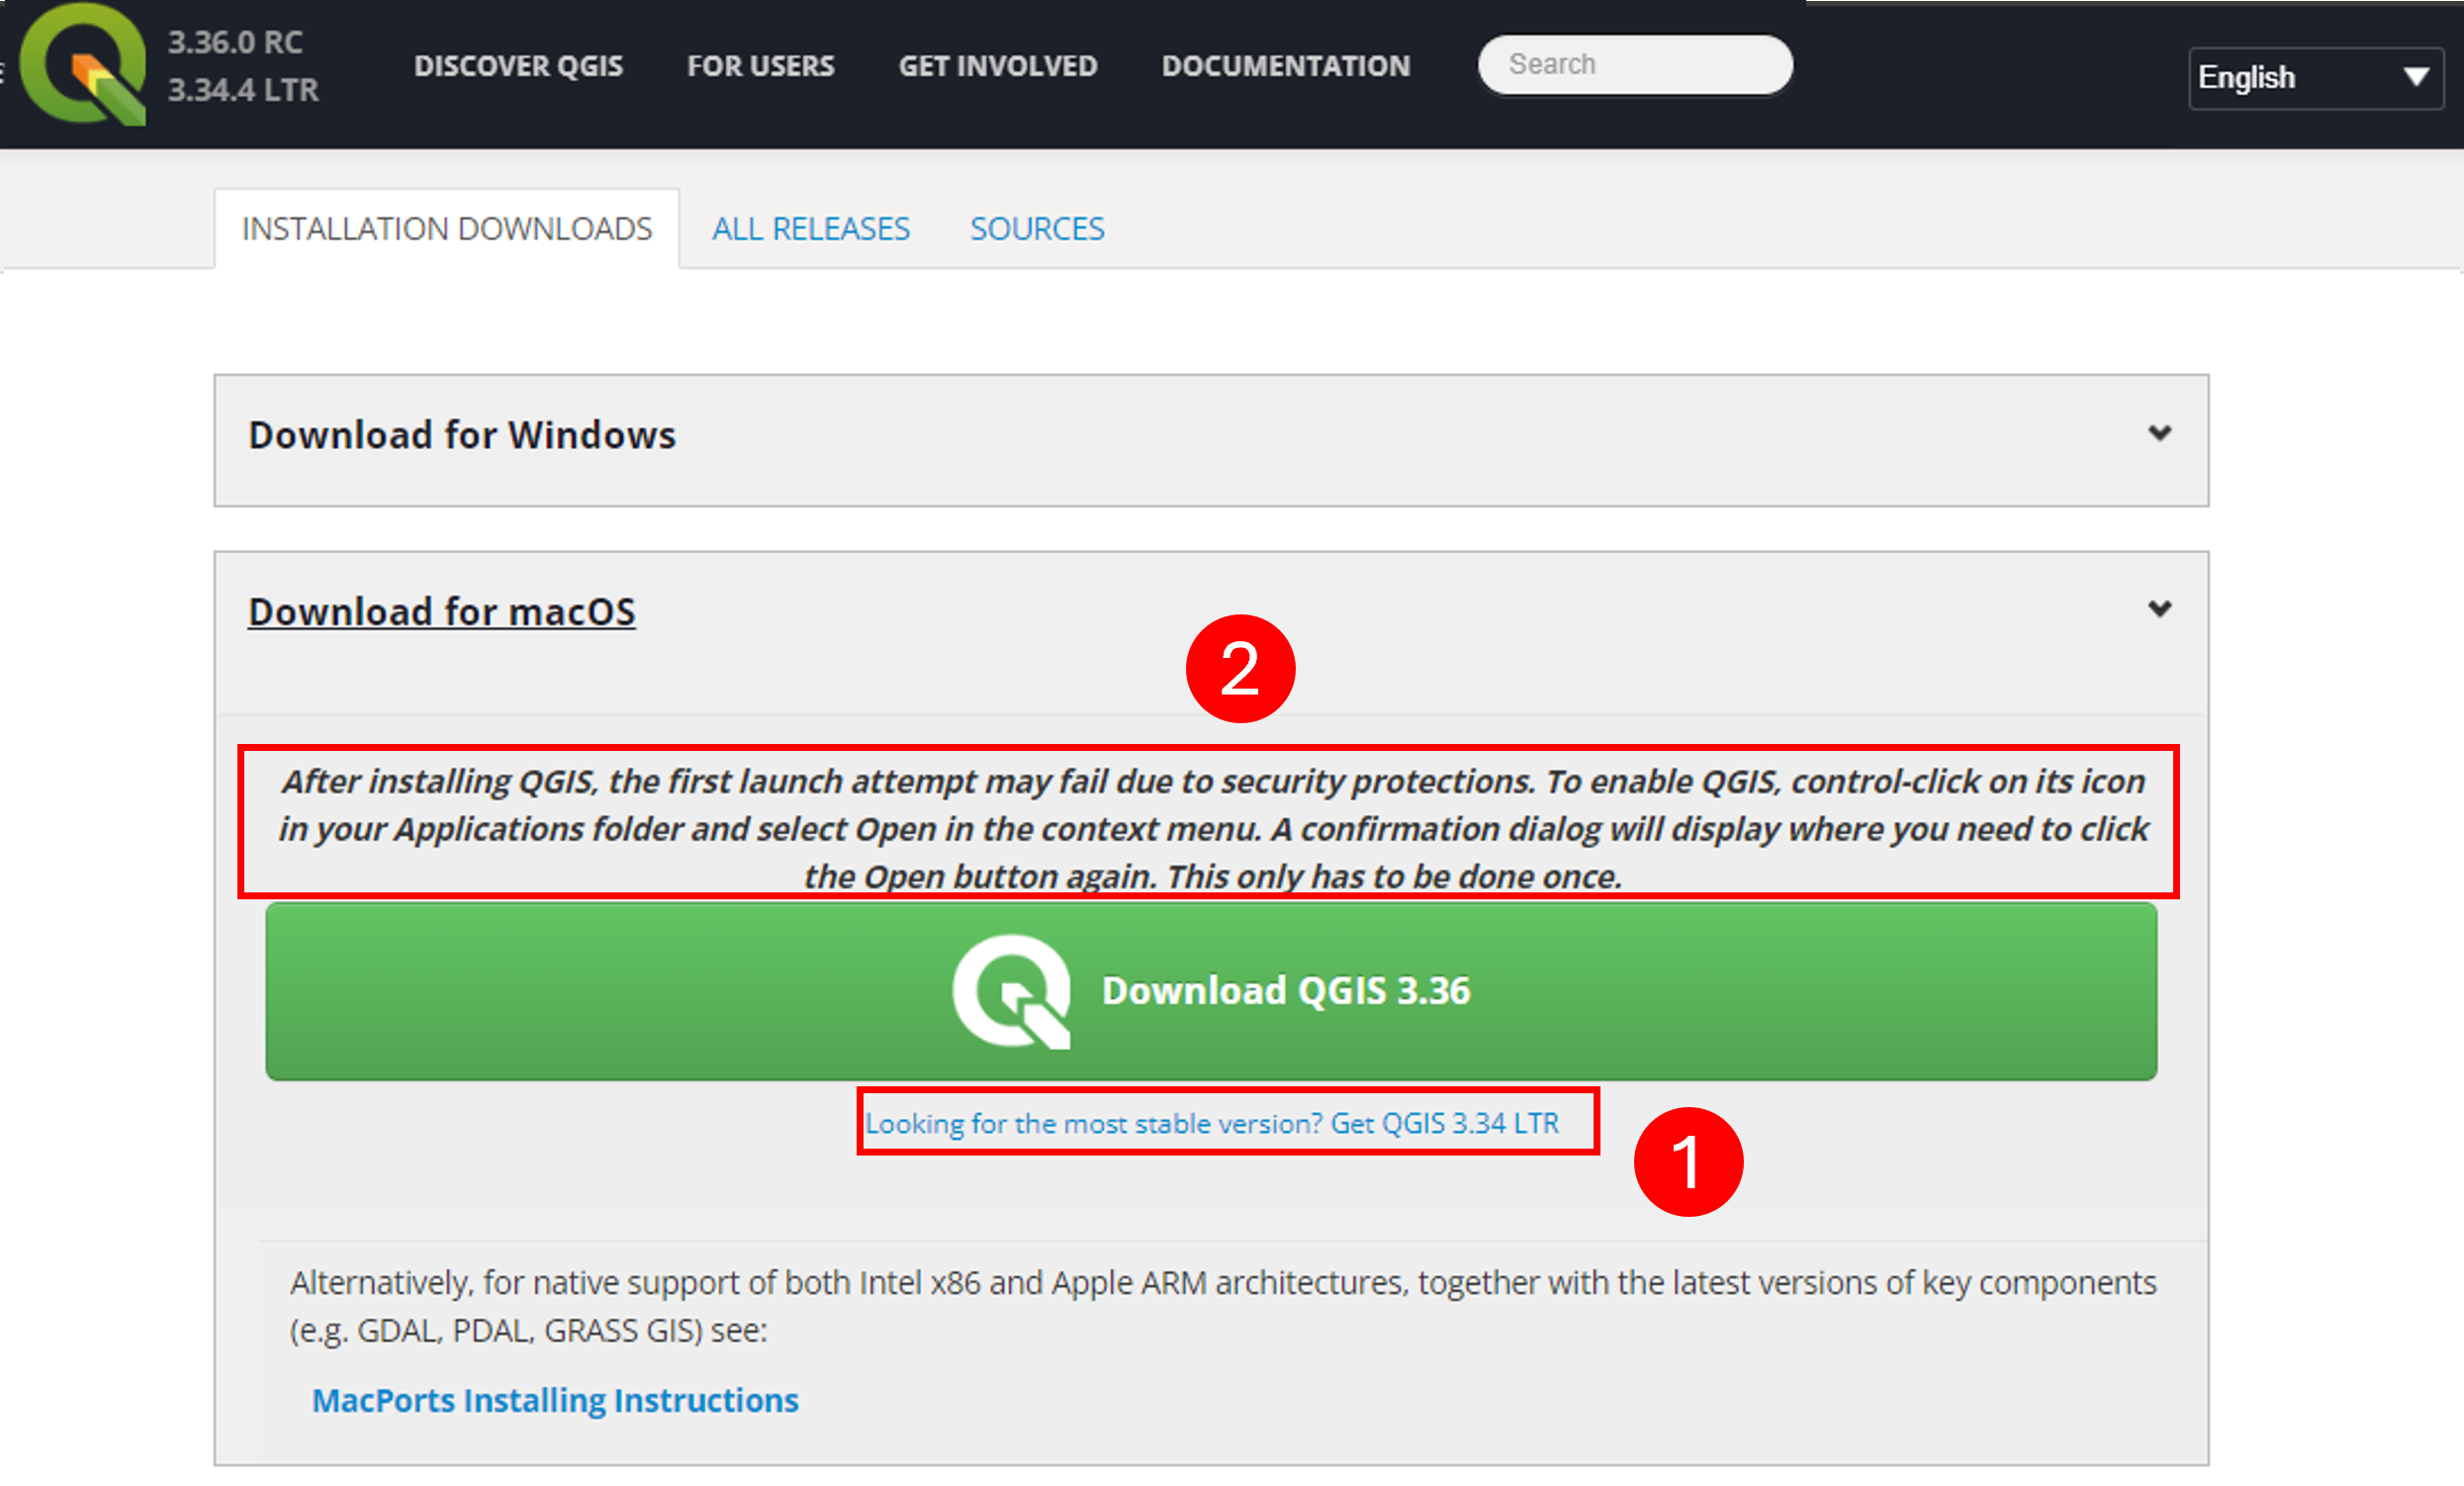
Fig. 1.2.1.2 – Download QGIS for macOS
1.2.1.3. Download QGIS for Linux
Most Linux distributions (distro) split QGIS into several packages, you’ll probably need qgis and qgis-python (to run plugins). Packages like qgis-grass (or qgis-plugin-grass), qgis-server can be skipped initially and installed only when you need them. Below you find instructions to install per distribution. Click on this link to open the official QGIS website. Open the drop down menu Download for Linux. Click on your choice’s distro (1) to start the download then follow the installation steps. (Fig. 1.2.1.1)

Fig. 1.2.1.3 – Download QGIS for Linux
1.2.2. QGIS Interface
As soon as you open QGIS, you will be prompted with its interface (Fig. 1.2.2.1) . In the top left corner you can see the project name (1), under it there is the Toolbar (2) where tools can be shown instead of being hidden under different menus. It is useful to reach in a fast way your most used tools and plugins. On the left, under the toolbar, there is the Browser panel (3) from which you can access your database. Under the browser panel there is the Layers list (4), here you can see all layers imported in the project. On the right of the screen you can see the Processing Toolbox (5) from which you can easily search tools (in case it is not present, later you will learn how to activate it). In the center you can see the map canvas (6) where active layers will be shown. Finally in the bottom part there is the status bar (7) where you can see different information such as the coordinates of the cursor, the map scale and the current coordinate reference system.
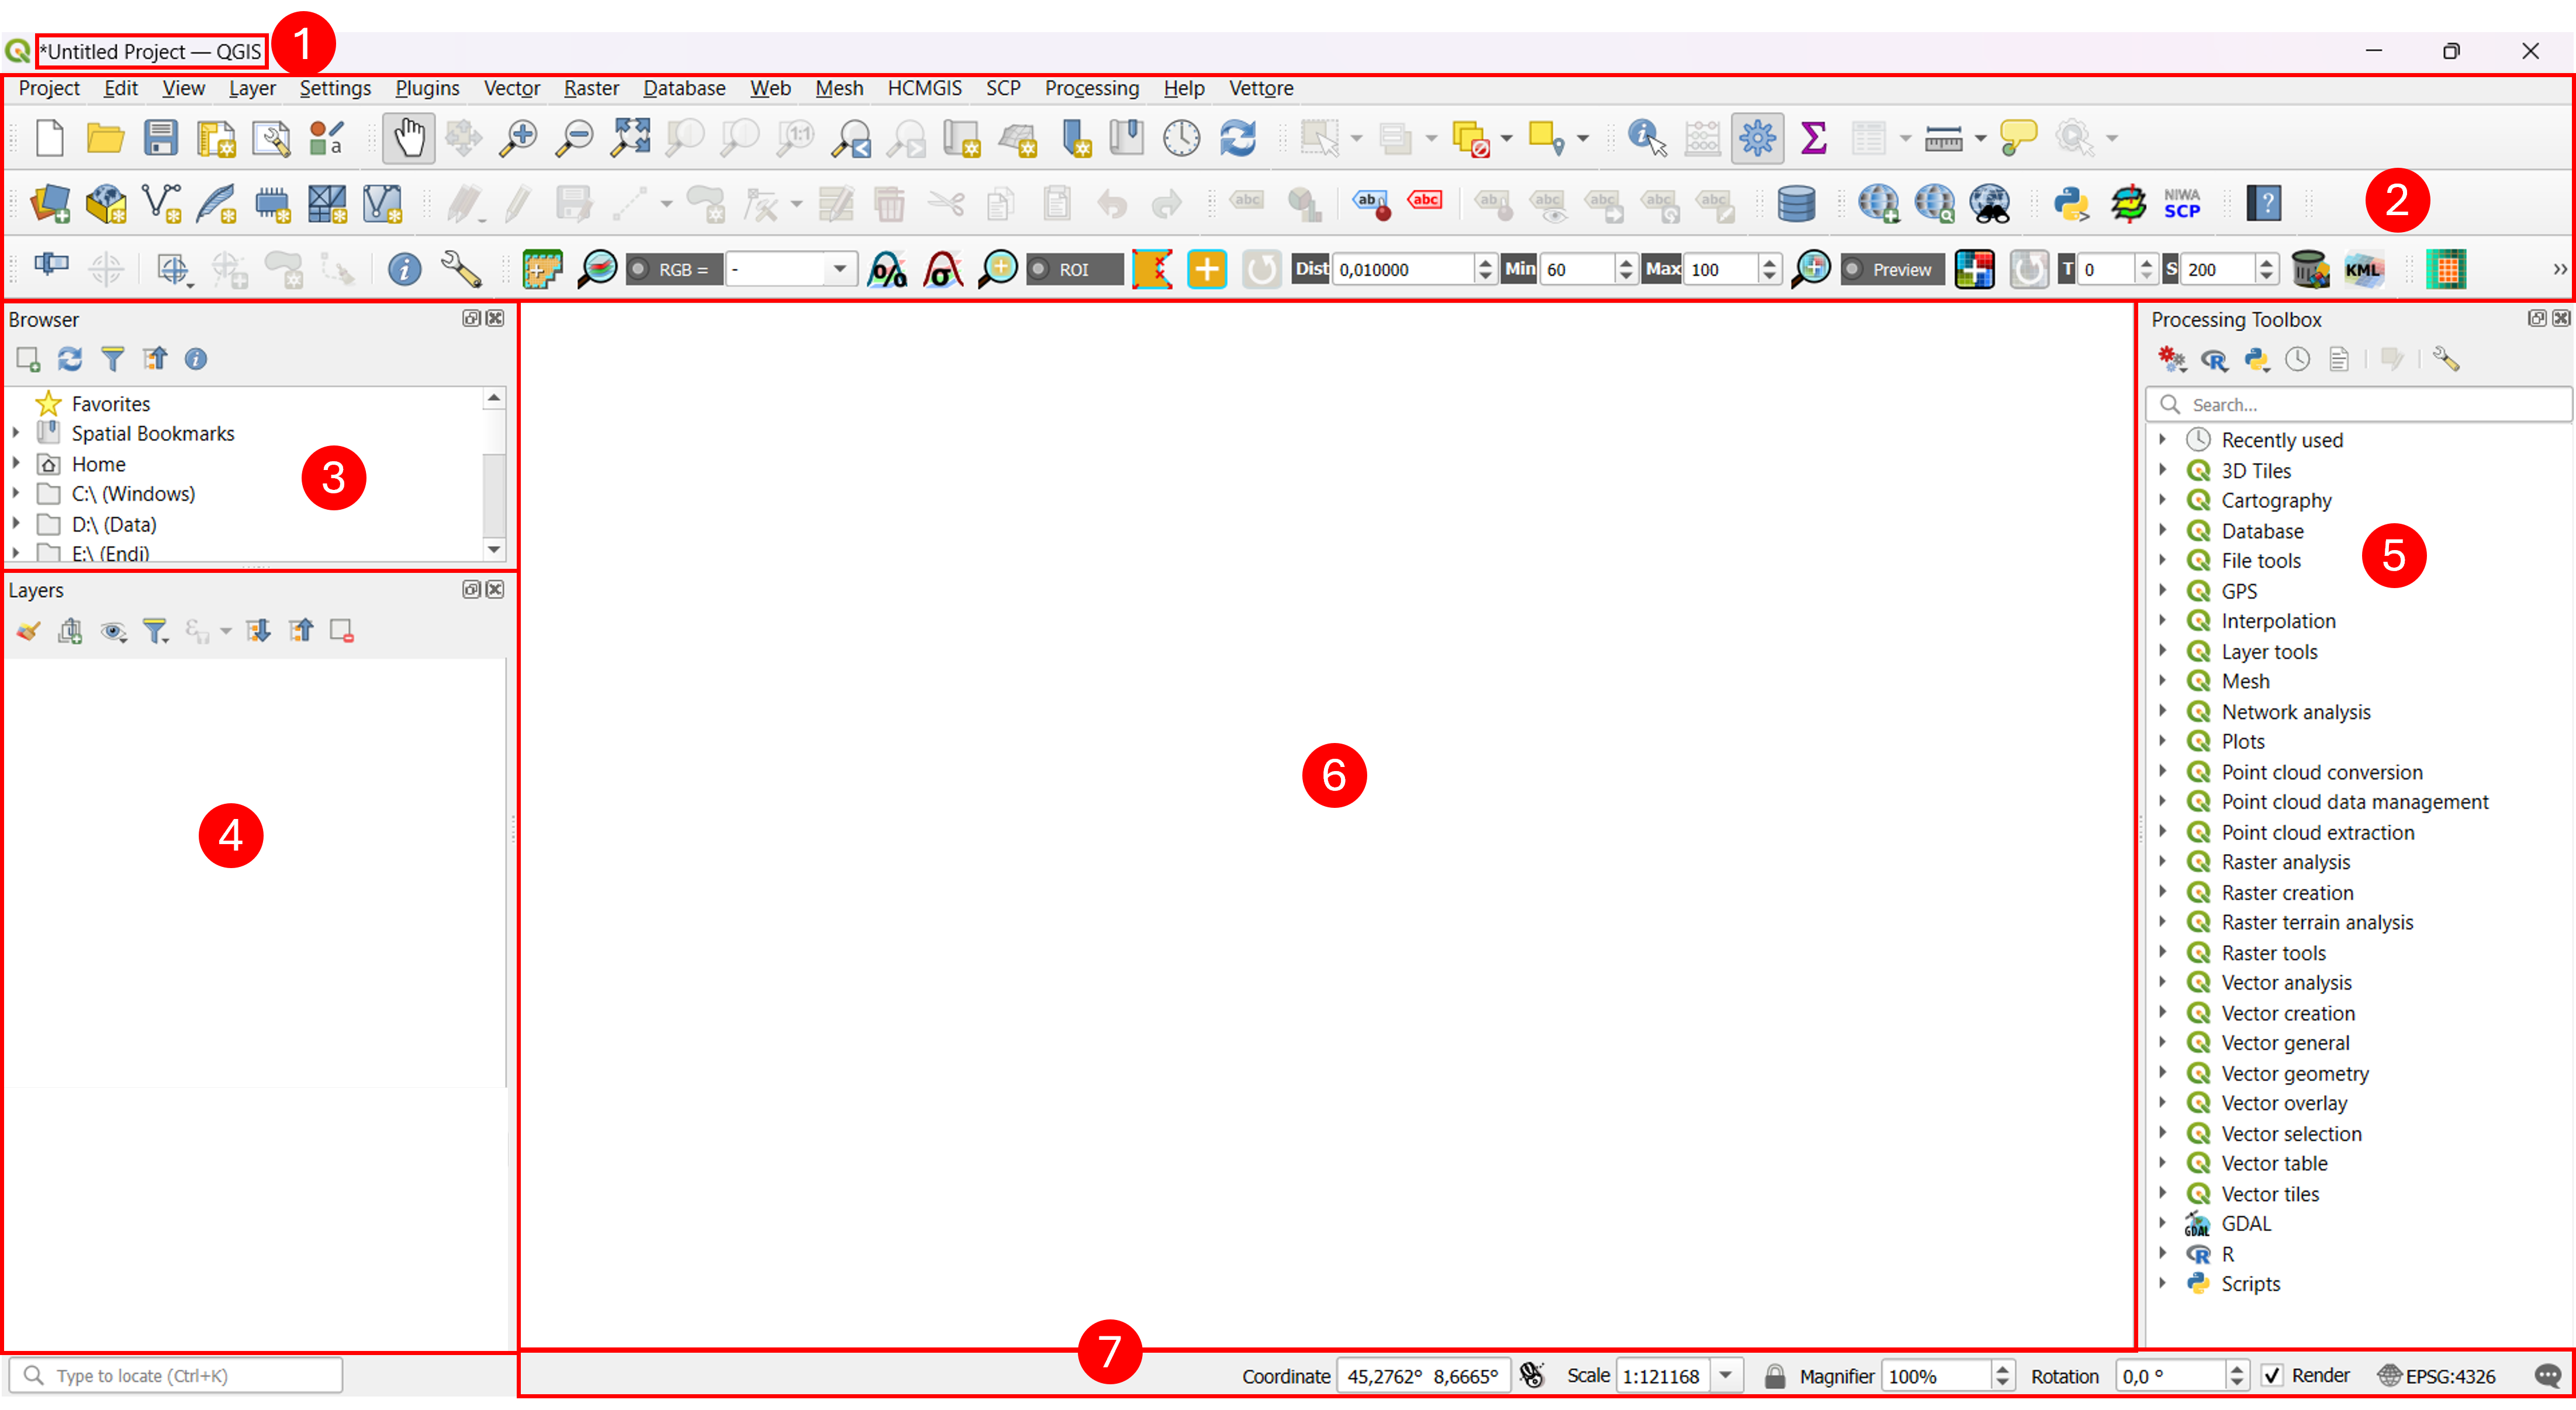
Fig. 1.2.2.1 – QGIS Interface - pt.1
In the event that some panels are not shown, you can activate them by clicking on View in the toolbar (1) (Fig. 1.2.2.2), and then moving your mouse over Panels (2). From there you can check the box of the panels that you miss. In this case we have activated the Browser (3), Layers (2) and Processing Toolbox (3) panels. If the panels are not placed as shown or you like to change their position, you can click on the panels name and, without releasing the pressure on your mouse, drag them where you prefer.

Fig. 1.2.2.2 – QGIS Interface - pt.2
1.2.2.1. Open QGIS project
To open a new QGIS project as shown in (Fig. 1.2.2.3); click Project (1) on the top left corner of the toolbar then on New (2). You can also use the shortcut (CTRL+N).

Fig. 1.2.2.3 – Open new QGIS project
1.2.2.2. Import Background
From the toolbar click on Plugins (1), then click on Manage and install plugins… (2). The Plugins menu will pop up. Click on All (3), to view a list of all available plugins, then type “QuickMapServices” in the search bar (4). Click on QuickMapServices (5) and then on Install Plugin (6). (Fig. 1.2.2.5)
Warning
Internet connection is required for plugins installation.

Fig. 1.2.2.4 – Install QuickMapServices QGIS plugin
To access the installed plugin click on Web (1) and move your mouse over QuickMapServices (2), then move it over Google (3) and finally click on Google Terrain (4). (Fig. 1.2.2.5)

Fig. 1.2.2.5 – Lunch QuickMapServices plugin and import background
1.2.2.3. Layer CRS (Coordinate Reference System) and Project CRS
One of the most important things to know while working with georeferenced data is the coordinate reference system they belong to. Different layers can belong to different CRS. In order to check the CRS of a layer right click on it (1) and click on Layer CRS (2). A drop down menu will open where you can read it (3). There are many ways to check the project CRS, the easiest one is to rest your mouse on the icon on the left of the Messages icon present in the status bar, waiting a few seconds will make your current project CRS pop-up (4). (Fig. 1.2.2.6)

Fig. 1.2.2.6 – Project CRS and Layer CRS
1.2.2.4. Zoom-in to your city
Try now to find your city by zooming in the map canvas. (Fig. 1.2.2.7)
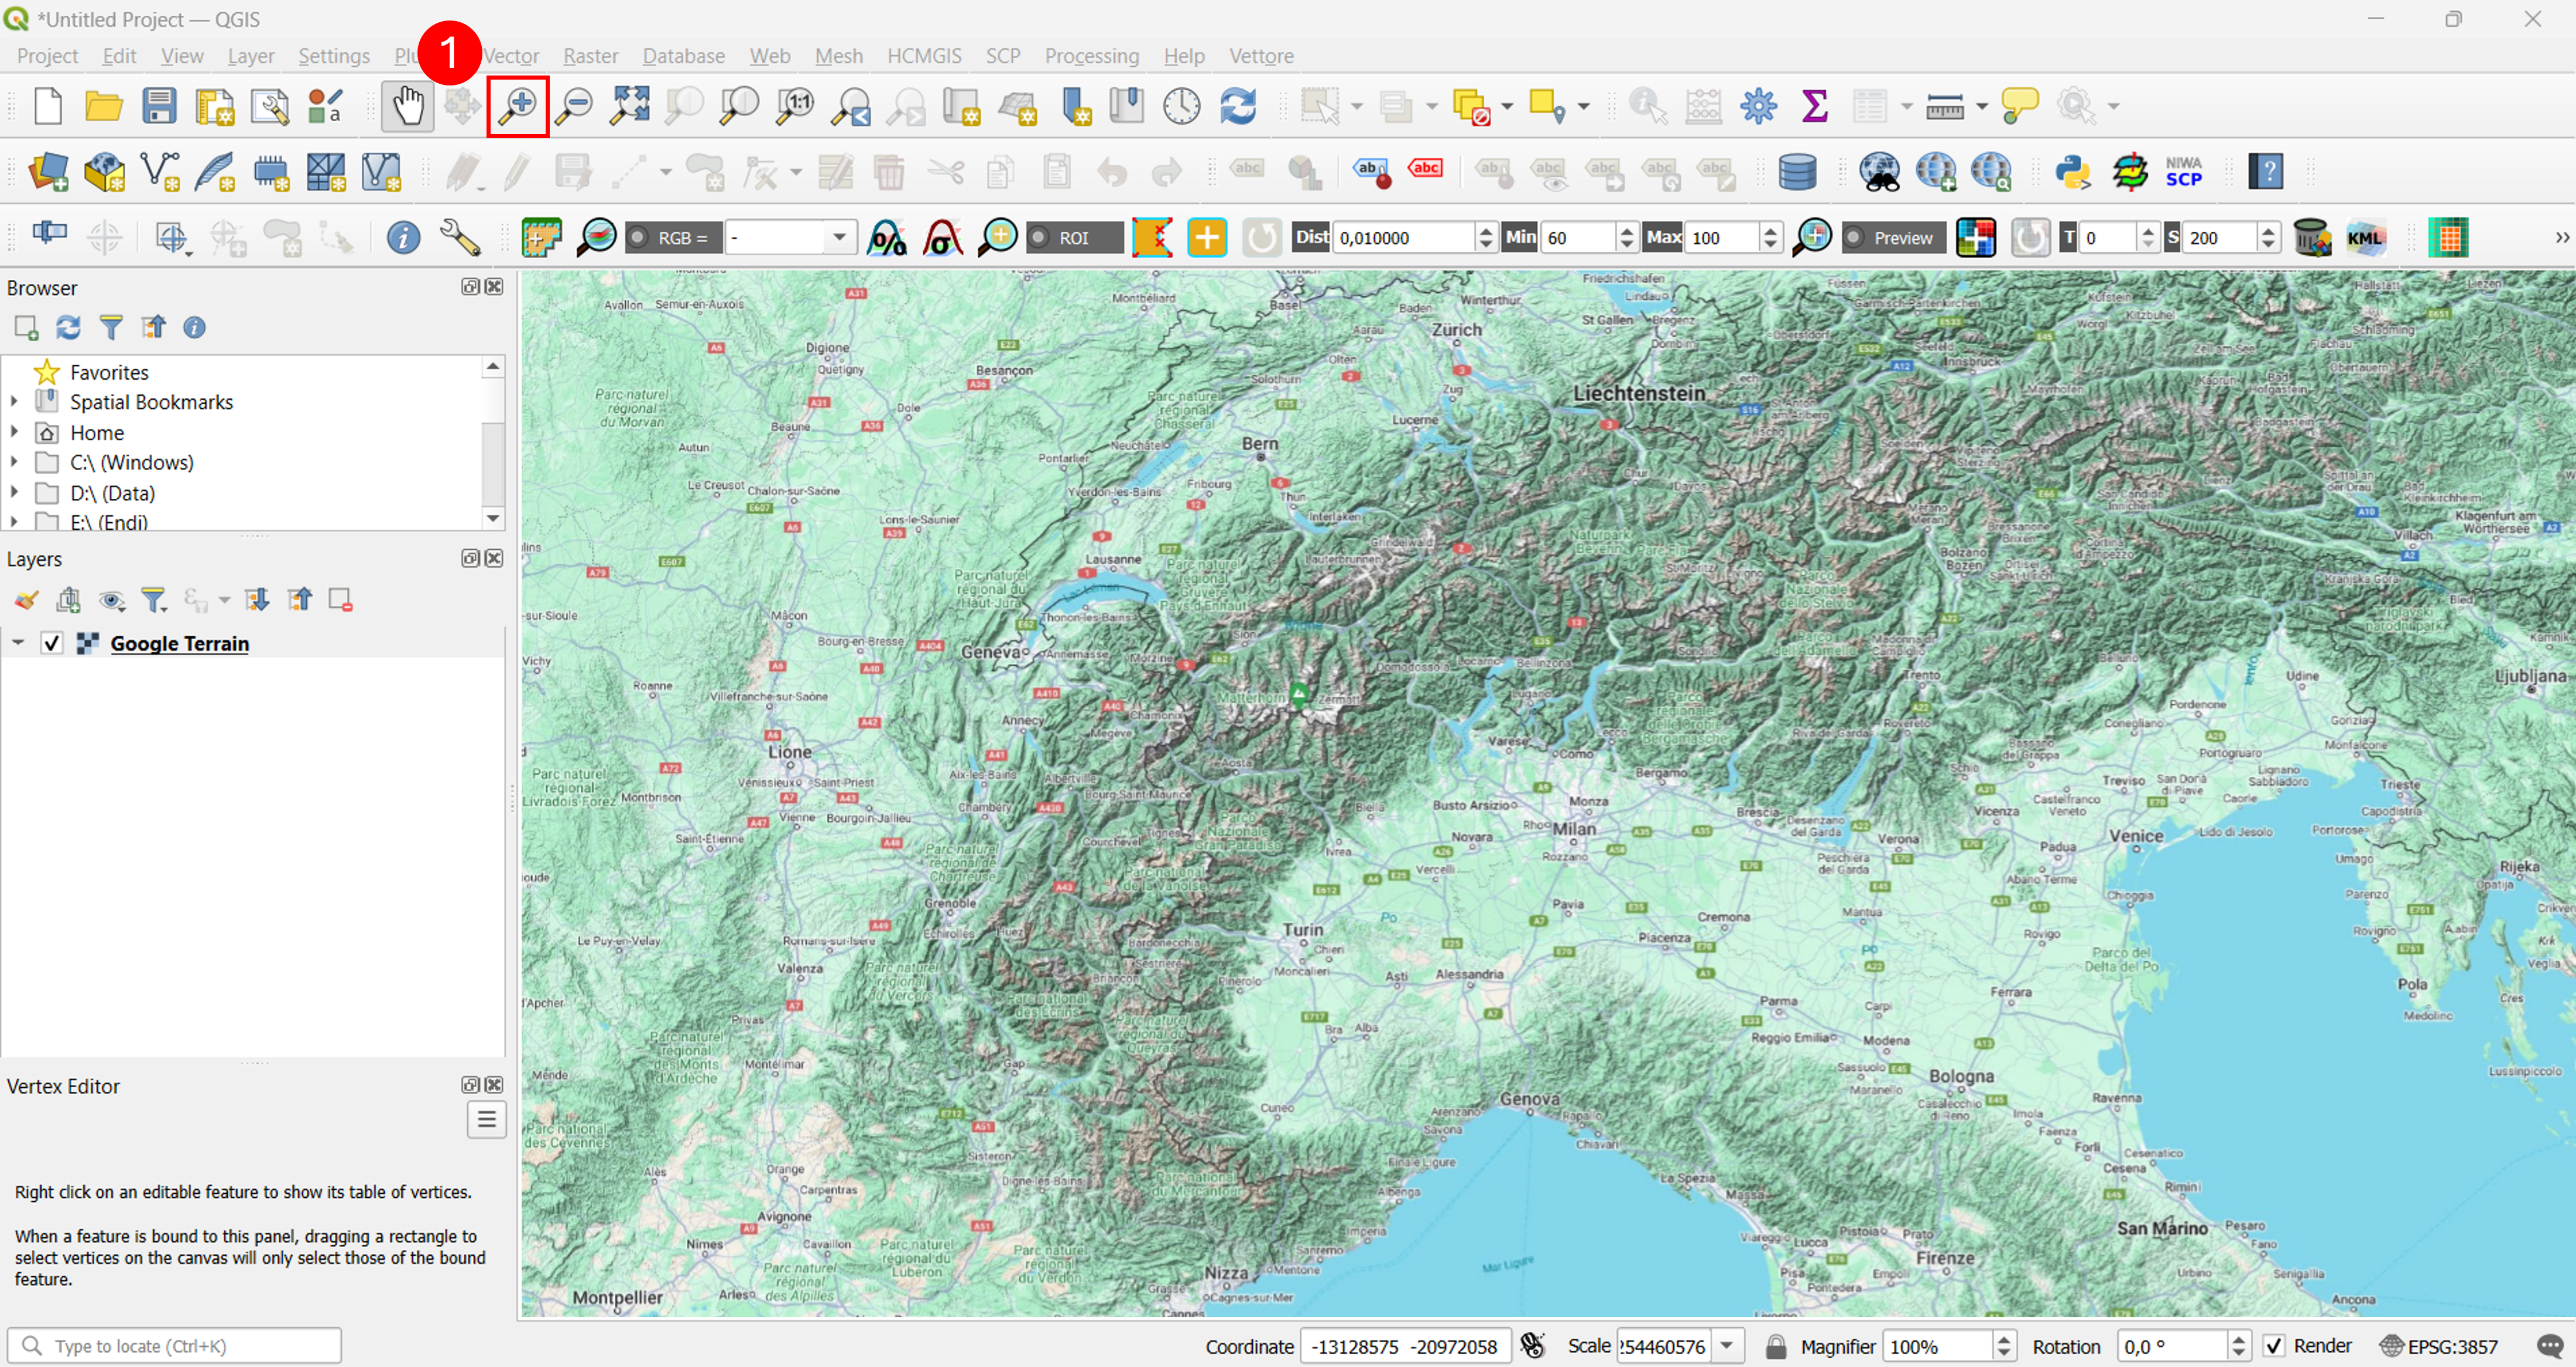
Fig. 1.2.2.7 – Zoom-in to your city
1.2.2.5. Save project
Saving the QGIS project can be done by clicking on Project (1) on the top left corner of the toolbar and selecting Save (2) from the drop down menu, as illustrated in Fig. 1.2.2.8.
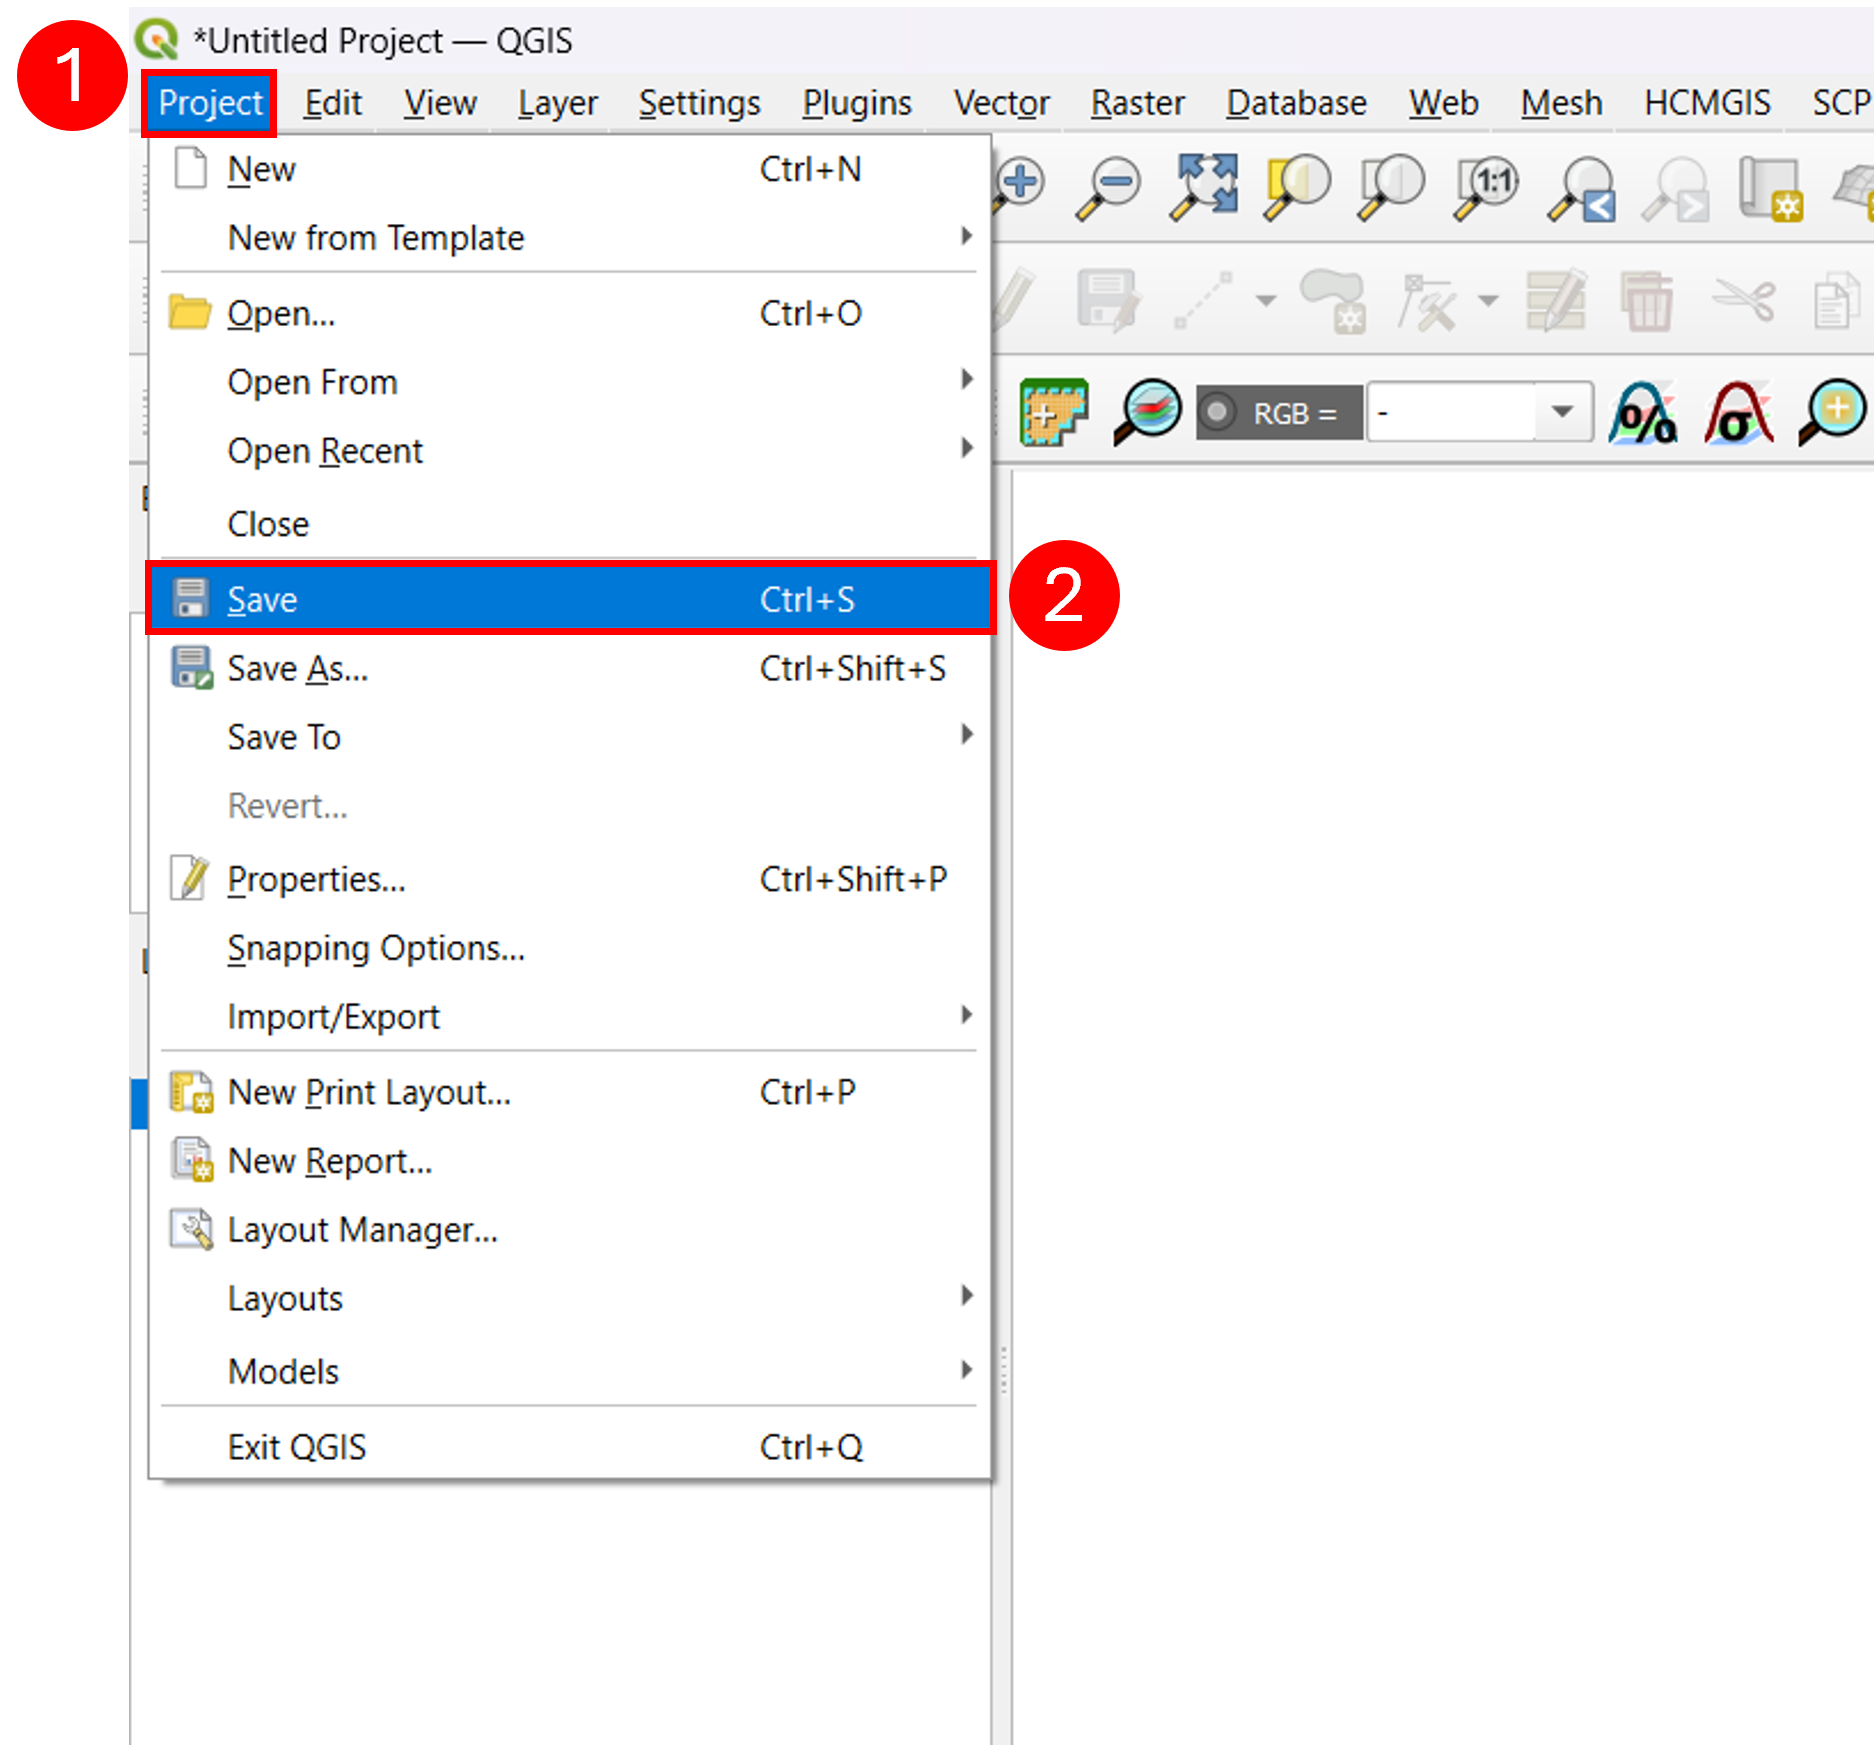
Fig. 1.2.2.8 – Save QGIS project